T J Turner is an online paper crafts Store based in South Australia. We sell a variety of paper craft products including embellishments, stickers, diecuts and handmade greeting cards. http://tjturner.openstores.com.au/index.html

Are you into cardmaking and scrapbooking either paper or digital. We now have a papercraft forum at

http://tjturnerpapercrafts.spruz.com/


Saturday, April 3, 2010

Card Making Glossary

Acid Free

Products free of acid at the time of manufacture. Acid weakens the cellulose in paper over time, causing deterioration and discolouration.

Anti-static pad
Swipe or dab over your card to eliminate static, and those annoying stray bits of embossing powder that should be carefully brushed away. Recommended for dark coloured card.

Archival Ink
Acid free, fade resistant, quick drying, waterproof ink won't bleed damage paper or photographs. Ideal for archival projects.

Art Wire
Permanent coloured copper wire, available in a variety of colours and gauges (thickness). Great for embellishments and bindings.

Brayer
A soft rubber roller, used for producing backgrounds.

Craft Knife
A sharp knife with pinted replaceable blades, used for precision cutting

Crafty Stickers
Foil or plastic stickers, usually available on a sheet or foll. Simply peel off and stick on your project. Available in different colours and themes.

Cutting Mat
A self healing cutting mat, used to protect your work surface when using a craft knife.

Double Sided Mounting Tape / 3D Tape
Double sided adhesive foam tape. Apply to the back of a cut out image to raise it above the main image, creating a three dimensional effect.

Dove Blender Pen
A fibre nibbed pen with clear, blending ink. Great for blending colours together to give your colouring in a professional look. Replacement nibs and ink available. The ink can also be embossed.

Dye Ink
Quick drying, water based ink.

Embossing Powder
A fine plastic powder that will adhere to wet inks and tacky surface. The powder melts on heating to form a raised, glossy finish.

Foil
A foil attached to a plastic film. When rubed over a tacky surface (eg. Sailor glue pen, embossing tape, jac paper) the foil adheres to the sticky surface leaving a shiny, foil finish to your projects.

Glitter
Shiny ornamental metal fragments, available in a huge range of colours and different grades.

Glitter Glue
Glitter suspended in glue. Available in a variety of colours and brands, in pen form or in a fine nozled applicator bottle.

Gold Leaf
Gold flakes that adhere to tacky glues, tape, sheets and transfers.

Heat Gun
A tool that produces hot air (without the wind!), allowing projects to be heated as required (used for melting embossing powder).

Jac Paper
A double sided glued paper. Heat resistant

Layer
To place card or paper of increasing sizes around an image, creating a frame around it.

Liquid Applique
a paint that expands and 'puffs up' on heating, available in a number of colours in an applicator pen.

Liquid Pearls
A pearlescent three dimensional paint. Available in a variety of colours in a fine nozzled application bottle. You can also add water and use as a pearlescent paint.

Lumieres
A permanent opaque pigment paint, available in a range of colours including some great metallics.

Mask
A paper cut out of a stamped image. Cut out slightly inside the outer line.

Masking
Stick the mask over an original stamped image on card, using a temporary glue. Stamp the second image partially over the masked image. When the mask is removed the second image will appear to be behind the first one.

Metallic Rub-Ons
A metallic paint that can be rubbed onto your projects, for metallic highlighting. Available in packs in various colour combinations.

Metal Shim
A thin sheet of metal, pliabl enough to shape with a shaping tool. Can be cut easily with scissors and also stamped and embossed. Available in a variety of colours.

Pearl Ex
A non toxic pearlescent pigment powder. Can be mixed with other mediums or rubbed over your stamped projects. Available in many colours.

Pigment Ink
Acid free, non toxic, fade resistant, archival, water based ink. Thick and slow drying to allow embossing powder to adhere to it. Won't dry on gloss paper.

Quick Laminate
A thick plastic sheet with one adhesive surface. Items can be placed between two sheets with the adhesive surface together for quick laminating. Different rands available.

Scoring
To break the surface fibres of card / paper to allow neat, precise folding of the card without creases or buckling.

Scoring Tool
Tool used to score card, some made from bone, others plastic.

Shrink Plastic
A plastic sheet that shrinks and thickens on heating. Can be cut easily with scissors and stamped on prior to shrinking.

Stamp Positioner
A T or L shaped tool used to enable the stamper to place the stamped image in the exact position desired.

Stipple
To apply a light layer of ink using a large stipple brush. Apply ink to the brush by gently tapping it onto the ink pad. Apply ink to paper by repeating the same movement.

Tombows
A brand of double ended water based art markers, huge range of colours available.

UTEE (Ultra Thick Embossing Enamel)
A large grain embossing powder. When melted the powder 'beads up' creating a bumpy teture. Further layers smooth out once heated to create the appearance of a glazed tile.

VersaMark Ink
Acid free, oil based, non toxic, clear ink. Creates a translucent 'watermark' on card and paper. Also great as an embossing ink or resist ink. A very versatile pad.
Dynamic Glitter Text Generator at TextSpace.net

Basic Card Making Information

Basic Materials:

Paper
Card
Card blanks

Basic Tools:
Metal ruler
Craft knife
Scissors
Paper trimmer
Self healing cutting mat
Glues / adhesive tapes

If you are interested in getting into cardmaking.

Basic Materials:

Paper - available in handmade, patterned, vellum, metallic and more. Paper is perfect for building up layers on handcrafted cards. Special papers can also be used as card inserts.

Card -this is thicker and stiffer than paper and is an ideal surface for making cards. It comes in a huge range of colours and finishes and can be bought in a variety of sizes as a single sheet or in packets.

Card Blanks - pre-folded card that has no design on it. These are available in a variety of shapes, colours and finishes and are available with matching envelopes.

Optional Extras:
Outline stickers
Embellishments
Card toppers
Pen and markers
Handmade paper
Cellophane bags
Craft box
Craft punches
Rubber stamps
Ink pads
Embossing powders
Heat tool
Light box
Dry embossing templates and tools

Card Making Techniques

Card Toppers
These are pre-made decorations, often with a self adhesive backing. They give an interesting 3D effect and are a good option for beginners. No glue is required and a simple card need only consist of a card topper placed on a card blank.

Embellishments
These can be used to add that special finishing touch to your card making projects. Embellishments are basically anything you can stick onto your cards to compliment the design and include stickers, card toppers, wooden shapes, skelton leaves, wire, beads, ribbons, eyelets, brads, foam shapes, pom poms, faceted stoens, petite flowers, mirror tiles and much much more.

Embossing
Dry embossing - this technique uses either a light source, for example a light box, metal templates and an embossing tool or specialist embossing systems to create raised designs and textures on card, vellum paper and metal foil. For added effect, the raised surface can be coloured with a pen or pencil.

Heat embossing - this technique uses embossing powder, pigment or specialist clear embossing ink and a heat tool to create raised designs on card, paper and craft foam. This technique is most often used to add an extra dimension to rubber stamped images.

Glass Painting
This involves the use of specialist wate or solvent based lass paints and glass paint outliner or peel off stickers to create designs on glass or acetate.

Iris Folding
This simple technique involves folded strips of coloured or patterned paper, that are layered, according to a template, into a spiral pattern behind an aperture in a card blank. The name originates from the folded paper designs resembling the iris of a camera.

Lace / Coluzzle
This technique involves the use of specialist lace and coluzzle templates to make an intricate pattern of cuts and folds into paper and card. The end result is a distinctive interlacing effect, which can be enhanced by using duo paper or card, which has a different colour on each side.

Outline Stickers
These are self adhesive coloured greetings, letters and shapes that offer an easy and stylish way to personalise your cards. They can be used on a variety of surfaces including card, gift boxes, wedding stationery and photo albums. A wide range of messages from Good Luck and Best Wishes to Congratulations and Happy Birthday are available in a variety of colours.

Parchment Craft
This technique involves the embossing and iercing of vellum paper with a needle to give it a raised appearance that often looks like lace.

Punching and Cutting
Hole punches and decorative scissors can be used to create a variety of different patterned edges and shaped holes on paper and light weight card. The 'punched' shapes can also be used to add layers and interest to your cards. Always practice on a piece of scrap paper first.

Quilling
This is the ancient art of rolling thin strips of paper into different shapes and using the shapes to form designs on cards, boxes and pictures.

Rubber Stamping
This is a quick and effe ctive method of producing repeat patterns. Stamps are used with an ink pad and can be embellished with embossing powder to creat a raised finished. Once dry, stamps can be coloured in with felt pen or watercolour pencils.

Shaker Cards
Shaker cards are made using an aperture card blank and confetti which can be made fro msequins or beads or shapes produced from punching. The aperture is sealed with acetate by surrounding it with self-adhesive foam strips, making a cavity which is filled with the 'confetti'.

Teabag Folding
This folding technique originated in Holland and was first created by folding the paper envelope that t-bags were packaged in - hence its name. It is a paper art form used to create 3-D greetings cards and invitations by folding paper. Designs can be created using any paper, although a range of specialist papers are also available.

Using papercraft Tools

Border Punches
Create a continuous border on paper or light weight card by using the white pattern printed onto the border punch. Begin by punching once anywhere along the border, then slide the punched section over to the left or right until it lines up directly with the white printed section on the tool. Continue in both directions until the entire border is punched. Use markings on the punch as a guide to centr or turn corners.

Decorative Hold Punches
If your punch won't press, the material you're punching could be too thick so use a lighter weiht paper or card. To re-sharpen your punch, punch through aluminium foil or sandpaper.

Paper Edgers or Decorative Edges Scissors
To cut a straight line with your paper edgers, use a ruler and pencil to draw a straight line on the backside of the paper to be cut. As you cut with the paper edger, make sure the edg of a pattern touches the line eactly the same each time the pattern is cut.

ShapeBoss
Use a ShapeBoss to create crisply embossed designs on almost any thin material from bellum and card through to metallic papers, foil and even metal. Assemble your material and stencil on the ShapeBoss following manufacturers instructions. Use the stylus to outline the stencil design for an instand embossed effect. To make your embossing go more smoothly, place wax paper between the top stencil and the material to emboss.

ShapeCutter
Use a ShapeCutter to crop and cut shapes easily and accurately. Adjust the blade up or down until you are happy with the finished cut. Always practice on scrap paper of different thickness before starting a project to help you get a feel for how firmly you need to press.

Texture Plates
Place card or paper over the texture plate, secure with low tack tape and rub with a stylus, coloured pencil or crayon. This gives a great effect for die cuts and backgrounds.

Useful Hints and Tips

When tearing mulberry paper, use a ruler, paintbrush and water. Lightly score the paper along the line you want to tear then brush water onto the line. Use your fingers to tear along the wet line. This will give a fluffy, feathered effect edge.

Use sticky fixers or glue dots to give a raised image to embellishments.

To avoid unslightly glue when using vellum, use spray adhesive or glue intermittently and cover the glue areas with embellishments. Alternatively secure vellum in position by using outline stickers.

Use a cocktail stick or a pair of tweezers to peel outline stickers of their backing sheets.

When making wedding invitations use an inexpensive technique and a design that is quick to replicate and relatively light and flat for posting.

Using an outline sticker the same colour as your card will give an embossed effect.

Dynamic Glitter Text Generator at TextSpace.net

Greeting Card Sayings - Friendship

Everyone hears what you say

Friends listen to what you say
Best friends listen to what you don't say

Count your life by smiles, not tears
Count your age by friends, not years

A friend is someone who chooses you...
...Out of a whole world of people

When hands reach out in friendship,
hearts are touched with joy

A friend is someone who understands
your past, believes in your future, and
accepts you today

Dynamic Glitter Text Generator at TextSpace.net

Greeting Card Sayings - Wedding

Wishing you an eternity of happiness together

May you grow to love each other more every day of your lives

Wishing you a happy marriage
and hoping that your
life together will be rich
in joy and love

May this day you share
be filled with love and laughter
may all the days ahead
be happy ever after!

Dynamic Glitter Text Generator at TextSpace.net

Greeting Card Sayings - Misc.

Love Sayings
Roses are red
Violets are blue
I just wanted to say
I love you!

Easter Sayings
Happy Easter

Hoppy Easter

Sympathy Sayings
In deepest sympathy!
My thoughts and prayers are with you

With heartfelt sympathy

Valentine Day Sayings
For my wife... my one and only valentine
you are very special

Just wanted to tell you that you are special
and to wish you a very
Happy Valentines Day

Happy Valentine Day

Because you're so special
this is coming your way
with love and kisses
on Valentine's Day

Dynamic Glitter Text Generator at TextSpace.net

Greeting Card Sayings - Thankyou

Thankyou for your kindness

Thanks for being my friend

Thanks a bunch

Thankyou much more
Than a greeting can say,
Because you were thoughtful
in such a nice way!

A note to thankyou and to say
the memory of your houghtfulness
will be remembered
for many a day

Many, many thanks to you!
you brought real delight
and helped make my day
more happy and more bright!

Please accept our sincere thanks
for the lovely gift
Both the thought and the gift
made us very happy

We sincerely appreciate
and thank you
for your very lovely
Wedding gift

Our sincere thanks
for all your good wishes
and very lovely gift

You treat me like one
of the family ...
But thanks anyway!

Thank you!
I'm speechless ...
that's a first!

Dynamic Glitter Text Generator at TextSpace.net

Greeting Card Sayings - Birthday

The warmest of greetings

are coming to you
with the very best wishes
for happiness too
not only for now
when your birthday is here
But day after day
Through the whole of the year

Happy Birthday

Wishing you every happiness this
special day brings
Have a wonderful birthday!

May today be filled with all the things you're wishing for
Happy Birthday

Happy Birthday to the worlds's Most special daughter!

Happy 50th Birthday to you!

Just a note to say
Have a very, very
Happy Birthday!

Hope lovely surprises
are coming your way,
to make your
birthday a
wonderful day

Happy Birthday

This special
Birthday greeting
is being sent your way
with many happy wishes
for a truly perfect day


Happy Birthday

Dynamic Glitter Text Generator at TextSpace.net

Greeting Card Sayings - Baby

A cute baby boy

to cuddle and squeeze,
to pamper and play with
and bounce on your knees!

Congratulations

A small child
So precious and sweet
Has come into your lives

A baby boy's a blessing
A gift from heaven above
A preciou little angel
To cherish and to love

Your lovely bouncing baby girl
will ring you so much pleasure
and over the years will give you
such memories to treasure

May your precious little one
fill your lives with happy days
in many new
and countless ways

A baby will make love stronger
Days shorter, Nights longer
Bankroll smaller, clothes shabbier,
The past forgotten
And the future worth living for

A baby is cuddles and tickles on toes,
the sweet scent of powder, a kiss on the nose!
A baby is teddy bears, rattles, and pins, meals at midnight...
giggles and grins.

A band new miracle ...
... to call your own!


Congratulations

Congratulations on your new bundle of joy

Dynamic Glitter Text Generator at TextSpace.net

How to use embossing powders

Using embossing powders for your card making ideas is just one of the ver satile techniques commonly used by crafters. Embossing powders are a wonderful addition to and card makers or scrapbookers craft box.


Embossing powders come in a huge variety of colours and textures and can easily be used by beginners and professional for cardmaking ideas.

Using embossing powders for your projects can create many different efects but you will need to purchase a few basic materials.

The main item you will need to be able to use your embossing powders is a heat gun, these can be found at most craft stores or stamp companies. Some heat guns are better than others, when you are purchasing a heat gun it is worth asking for recommendations from other experts that have used them for their cardmaking ideas.

You will need to have an ink pad, ink pads come in many different colours. You can use a clear ink pad however if you are a beginner you can start with a colour so you can see where yuo have stamped.

Stamps - a stamp is essential when using embossing powders as this is the foundation of the design, rubber stamps can be found at craft shops and tere are simply millions that can be bought over the internet.

Of course you will need embossing powder, again these come in a hug variety of colours, try to match the colour with the theme of the stamp where possible.

To begin embossing it is advisable to wipe the area wher you are going to stamp with an anti static bag.

Once the area is prepared it is time to ink your stamp. Choose your colour of ink preferably clear but if you are new to carmaking ideas then a matching colour to your embossing powder will be fine. Always take your ink pad to the stamp rather than pressing the stamp into the inkpad, this will give the stamp an even coating.

Once you have inked your stamp you can then press it firmly onto your project, hold your hand flat over the stamp to ensure the entire image is printed, press firmly using the palm of your hand, lift the stamp carefully away from the project and make sure you are happy with the result.

Carefully undo the lid of the embossing powder and generously sprinkle over the stamped image, if you are using a tidy tray tip all the excess embossing powder can be easily tipped pack into the pot. Try folding a piece of paper.

Gently tap the back of the project or card to allow any excess embossing powder to ocme off if you can see any odd bits of embossin powder still in places it shouldn't be, use a small paint brush to gently remove it.

Use your heat gun to heat the image until it turns shiny, hold your heat gun approximately 6 inches from the paper sweeping backwards and forwards until you see the embossing powder melting. Do not over heat the image as you can cause the paper and embossing powder to burn.

Once you are happy that all the embossing powder had melted you are done. Step back and admire your finished project.

 
Dynamic Glitter Text Generator at TextSpace.net

Christmas Cards made using Santa diecuts

Santa Card 001

Santa Card 002

Santa Card 003


Dynamic Glitter Text Generator at TextSpace.net

Christmas Cards made using Reindeer Head diecuts

Reindeer Card 001

Reindeer Card 002
Reindeer and Holly Christmas Card


Dynamic Glitter Text Generator at TextSpace.net

Christmas Cards made using Santa diecuts

Santa Card 004


Dynamic Glitter Text Generator at TextSpace.net

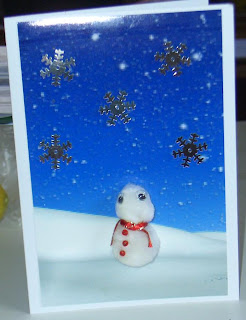
Pom Pom Snowman Card

What you need:
Card blanks
Pom poms various sizes
3mm ribbon - assorted colours
Wobbly eyes
Seed beads
Snowflakes
PVA glue
Scissors

How to make:
Glue a small pom pom onto a medium size pom pom to make the snowman and leave to dry.

Tie a piece of thin ribbon around the snowman's neck and glue in place.


Stick the snowman onto the centre of the card and glue three seed beads down it's tummy. Glue two eyes to it's head.

Finished off by sticking snowflakes around the snowman.


Dynamic Glitter Text Generator at TextSpace.net